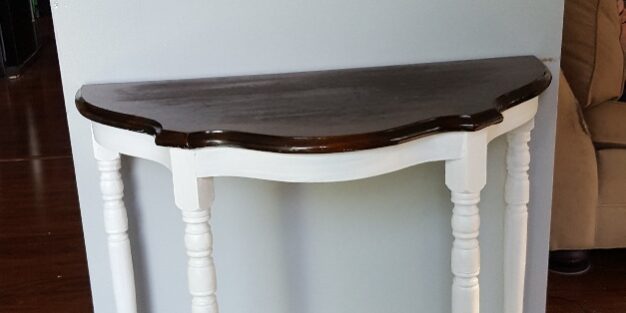
Chalk Painting Series #3: Painting an Accent Table
*This post includes affiliate links for your convenience. Click here to read my full disclosure policy.*
I have a confession to make – I get addicted to new craft projects! I started so small, painting the lid on a small mason jar for spices, and now I just can’t seem to stop painting with chalk paint! I pin new ideas for chalk painting in Pinterest all of the time (check out my Crafts and DIY Projects Pinterest board for some great ideas!) I absolutely LOVED the pins I was finding that showed the contrast of the natural wood top and the white painted legs and bottom! I thought that this would be the perfect look for our accent table in our entryway. So of course, I had to jump right in and give it a try!
Like what you’re reading? Subscribe to my blog at the top of the page on the right side to receive the most up to date posts and information.
Here are the steps that I took to paint our accent table with chalk paint:
Materials Needed:
- Minwax Wood Finish Penetrating Stain in Espresso 273
- Chalk Paint – I used Valspar tintable Chalkboard Paint in Bright White
- Clear Sealing Wax – I used ArtMinds Clear Wax
- Chalk Paint Brush
- Wax Brush
- Paper Plate
- Clean Cloths
Important Tip: Even though the chalkboard paint is white in color when you buy it, you will still need to have it tinted white as it actually dries clear (kind of like how Elmer’s Glue dries. Since I seem to learn everything the hard way, it took four coats of it without any tint before I realized that I wasn’t making any progress and I was going to have to go back and have it tinted white in order for this to work.
This is our accent table before I started. 
You can see that the finish on this table was getting worn – especially on the top. Of course, it was my grandmother’s table and I’ve had it for at least 18 years after she passed away so I’m not surprised that it’s showing its age. But that’s okay, I’ve included steps below to show how I brought new life to this accent table without a lot of elbow grease!
Steps to Follow:
- Take a clean cloth and dip it into the stain and wipe the cloth over the top and edges of the table (if using penetrating stain, only apply one coat or it will remain tacky and not dry fully
- Allow the top to dry thoroughly
- Dip the tip of the chalk paint brush into the chalk paint
- Dab the chalk paint brush onto the paper plate to remove the excess paint (you only need a little bit)
- Paint all parts of the table except for the natural top with a coat of the chalk paint
- Allow to dry for 1 hour
- Paint a second coat on the table with the chalk paint
- Allow to dry for 1 hour
- Repeat painting and drying for as many coats as needed to achieve the coverage you desire (this table took 4 coats because it was quite dark)
- Put a small amount of the clear wax onto the wax brush and dab the excess onto the paper plate (you only want a very little bit on the brush!)
- Brush the clear wax onto the painted areas of the table using a circular motion
- Allow to dry overnight
- Buff the clear wax with a clean cloth
Bonus Tip: If your table is going to see a lot of wear and tear or you anticipate having to clean it often, then you may want to use polyurethane to seal it. I noticed that when I cleaned the furniture that I painted with chalk paint, I was losing some of the wax with each cleaning. The polyurethane will prevent this from happening and allow you to preserve the beauty of your piece
I am thrilled with how this table turned out! Now it is a true show piece that I am proud to have in our entryway as the first thing you see in our home!
You can see how much better the top looks with the added stain, and I didn’t even have to sand it!
I hope you enjoyed this fun project and are now inspired to start your own! I would love to hear about your successes (and what you’ve learned NOT to do) with chalk painting so comment below to share your stories. And don’t forget to share this post through your social media platforms so your friends and family can try this DIY project too!


