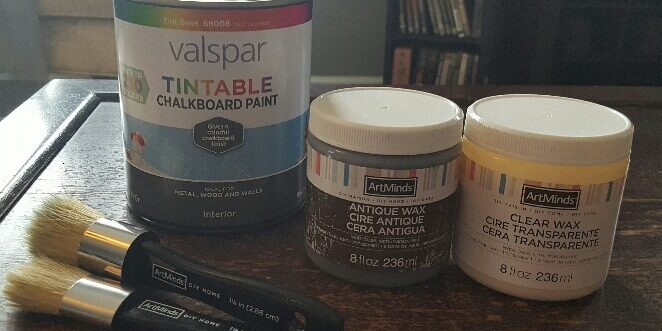
Good morning everyone! I am so excited to write this post for you this week! If you’ve been following my blog posts then you know that this is my second post about painting with chalk paint. If you missed it, click here to check out my first post where I showed you how easy it is to paint household items. This week’s post takes it up a notch as I walk you through how I painted our coffee table using chalk paint.
This coffee table (along with the 2 end tables that match) were bought at a yard sale for $35.00 almost 16 years ago! They have worked perfectly for our home, but they were starting to look worse for wear.
This winter I was just fed up with looking at them in this condition so I decided that in the summer I would most have to break down and strip them and re-stain them so that they would look decent again. I’ll be honest – I don’t like to strip furniture! What I found in the past when I did it is that it’s a pain, it’s messy, and it’s A LOT of work! That’s why I was so excited to see all of the pins on Pinterest talking about painting furniture with chalk paint!
Chalk Painting Series #2: Painting a Coffee Table
*This post includes affiliate links for your convenience. Click here to read my full disclosure policy.*
There were some beautiful pictures of hutches, tables, and dressers after being painted with chalk paint and it got me excited to try it out myself. I figured I would start with the coffee table because it was in the worst condition and if it didn’t turn out okay with the chalk paint, I figured it would motivate me to put the work in to strip and re-stain it.
Here are the steps that I took to paint our coffee table with chalk paint:
Materials Needed:
- Chalk Paint – I used Valspar tintable Chalkboard Paint in Hematite
- Clear Sealing Wax – I used ArtMinds Clear Wax
- Antique Wax – I used ArtMinds Antique Wax
- Chalk Paint Brush
- Wax Brush
- Paper Plate
- Sandpaper
- Clean Cloth
This is what the coffee table looked like at the start:
You can see the finish is scratched and in bad shape….
Steps to Follow:
- Because so much of the stain had been scratched off, I thought it would be best to sand the top of the table lightly to make it more even. I did not sand the legs or sides of the table, just the top.
- Dip the tip of the chalk paint brush into the chalk paint.
- Dab the chalk paint brush onto the paper plate to remove the excess paint (you only need a little bit).
- Paint the entire table with a coat of the chalk paint.
- Allow to dry for 1 hour.
- Paint a second coat on the entire table with the chalk paint.
- Allow to dry for 1 hour.

- Put a small amount of the antique wax onto the tips of the wax brush and dab the excess onto the paper plate (you only want a very little bit on the brush!).
- Brush the antique wax over the chalk paint to get the look you want (TIP: if it is too heavy, you can use a clean cloth to wipe some of the antique wax off before it dries).
- Allow to dry for 2-3 hours.
- Wash wax brush with soap and water and allow to dry thoroughly.
- Put a small amount of the clear wax onto the wax brush and dab the excess onto the paper plate (you only want a very little bit on the brush!).
- Brush the clear wax onto the entire table using a circular motion.
- Allow to dry overnight.
- Buff the clear wax with a clean cloth.
I am so happy with the final result!!!
Like what you’re reading? Subscribe to my blog at the top of the page on the right side to receive the most up to date posts and information.
You can see that the top of the coffee table looks better now!
I hope you enjoyed this fun project and are now inspired to start your own! Keep watching for my next chalk painting post in the series!! I’d love to hear about your successes (and what you’ve learned NOT to do) with chalk painting so comment below to share your stories. And don’t forget to share this post through your social media platforms!


